Game Overview
How to Play This Game
A session of No Stone Unturned is played out as a series of adventures. As a group, decide which card on the map to head to from their current location. Flip that card to reveal the location at hand. The author of the card will then paint the picture of what this location looks like and what is at stake. Use the Reward and Danger Levels as guides for the intensity of the description. More details on what those should correspond to are on the next page. Describe the reward that can be found here.
Each player then narrates a few sentences about the journey to that location as well as how their character feels about the task ahead of them. The characters then will split into two groups. Play out a brief scene on how you split up and who is with who. The players whose characters are not on screen will act as the Arbiters for those that are. Arbiters function in the same way as GMs in more traditional roleplaying games - describing scenes, acting as NPCs, and introducing conflict to the characters’ lives. The group that the author of the card is a part of will typically be the Arbiters first, so that they can set the scene a little better.
Sometimes, an action that a character undertakes will be uncertain and require a dice roll to resolve. This will be resolved using an Action Roll, which will allow certain players to add Details to the scene. After a few action rolls, it’s a good idea to switch to the other group as the tension in this scene rises. A cliffhanger or something that can affect both parties at once is a good place to change focus. Every time you switch focus or break up the party, all of the players not “on screen” will act as Arbiters together. Eventually, it will make sense for this adventure to come to a close. Your characters will meet up for one reason or another and likely leave the area that they are staying in. Perhaps you have found some treasure or knowledge, and maybe you are fleeing for your lives.
When that happens, there are decisions to make both in and out of character. First, if you haven’t taken a break from playing in a while, now is a good time to do so. You’ll also need to decide if this is the end of your current session. In character, you will decide whether to head back to your home settlement, or make camp somewhere else that is safe. Whatever choice you make, the game will shift into Downtime. The Downtime phase is described in greater detail later in the book, but it follows the same process every time. First, you roll for complications due to your actions at the location your characters just left and have a conversation about what immediately changes in your wake.
Next, each of your characters will have a chance to take one Downtime Action to recover from wounds, research how best to use the treasures they have taken, or try to patch up the problems that they caused while adventuring. If one action isn’t enough, you can collectively decide to spend more time at rest. However, every time you take another round of Downtime actions, you will roll for complications at one of the areas that you’ve visited. The world keeps moving even when you’re not. If you continue playing after downtime, adventure to a new location. Either flip a new card that you have access to, or return to an old one that you weren’t quite finished with.
Details
“Adding Details” in play
When players attempt things that are uncertain, they will make an action roll. The results of this will allow either the player or the Arbiters to add Details to the fiction. Details are just labels to succinctly explain a change in the fiction. For instance, if you were in a fight and your opponent pulled out a knife, you could end up with a detail, Stabbed.
Hard details describe a fundamental change to some property of a person, place, or thing (e.g., dealing damage, changing an object, annoying someone). They are added explicitly as a result of an Action Roll. During the game, write down all hard details added to a character, weapon, enemy, etc. For example, if you are rolling to convince the baseball coach to let you pinch hit, and you win the roll, you can add Persuaded as a hard detail to the coach.
Soft details can be added more freely and make only temporary or superficial changes to the world (e.g., moving around, calling out to an ally, asking a character a question). These are often added implicitly via moment-to-moment roleplaying (without saying you’re adding details to the scene). When you’re describing a scene or what your character is doing, you’re adding soft details. Thus, soft details need not be written down. If granted a hard detail, you can always choose to add a soft detail instead.
A scene detail is a detail that changes the scenery or your tactics, i.e., things that are part of the scene, but not a property of a character or item. For example, if you are rolling to blast open a door and the result of your Action Roll grants you one scene detail, you can simply add Blasted Open to the door and then walk right through it. If granted a hard detail, you can choose to add a scene detail instead. The Arbiters will maintain a list of scene details.
Positive vs. Negative Details
Details are typically negative or positive. Negative details are often harm details, which indicate damage to a character or item. Positive details are beneficial properties (e.g., Shiny and Sharp for a well-maintained sword).
Adding details drives the fiction forward from moments of uncertainty. If you’re stuck, just think back to the goal the character was trying to achieve and go from there. Don’t be afraid to push it and make dramatic changes to the scene! The important thing with the details you add is that they should make the story and world more exciting to you and to the other players at the table.
Action Roll Results
The result of an action roll determines how many hard details and scene details can be added after a roll and who gets to add them. When a player makes an action roll, they will be rolling two dice. They will then subtract the lower die from the higher die and compare the difference to the table below. The specifics of determining the winning side are discussed in the detailed steps for resolving Action Rolls.
Harm Details
Harm details track the physical and mental toll that adventure takes on an explorer’s body. Any details added by the Arbiters that make it difficult to continue adventuring in the same way should be counted here. Each player character has the capacity for 4 harm details before they get the Overcome detail.
Harm details cover more than just physical harm. Arbiters can assign harm details in any situation. A harm detail can be something physical like Sprained Ankle or Concussed, emotional like Embarrassed or Distraught, or even social like Ignored or Cast Out.
Harm details can be addressed by using the Recover action during Downtime. When a harm detail is addressed in this way, it is turned into a scar, which is a detail that will remain on your character sheet. Scars do not count as harm details and thus don’t contribute to a characting being overcome.
Overcome
When a player records their 4th Harm Detail, they get the Overcome detail. Circle this on your character sheet.
Overcome characters must be rescued and taken to a safe place as soon as possible. The player must use the Recover downtime move to clear at least one of the details before they can act again. Decide on a case by case basis what this means for your table. Depending on the type of harm they received, the character may need to retire from adventuring or even perish. Be honest with the fiction here, and allow yourself to let go of the character if the situation calls for it.
Recording Details
When hard details are assigned to your character, record them in the details section on your character sheet. If the Arbiters say that the detail counts as a harm detail, record it on one of the 4 lines designated for Harm Details. Otherwise, your character can have any number of positive and negative details. Make sure to consider what details you have while roleplaying and acting within the world, as they should inform how you interact with your surroundings.
Also remember to consider all of your details when resolving Action Rolls, as certain details can offer advantage or disadvantage to your Aspect Dice, as described on the following pages.
Applying Details
Don’t be afraid to think bigger than the action being tested when applying Details. A seemingly small action can have ripples throughout the land. Perhaps a player loses a roll to convince somebody in a new town that they mean no harm. You can apply Details in several ways. Here are two examples. You could apply the scene detail Uncooperative Population to inform the player that this conversation will leak out and there will be subsets of this population that will no longer cooperate with the adventurers and may even be outright hostile to them. You could also apply the hard detail Wanted to them - you hear shouts outside the building where you are having this conversation. A protest has formed to kick out the intruders. What do you do?
Recording Scene Details
Make sure to keep track of the scene details added to a location (such as Uncooperative Population from the example above). This will help you maintain a record of what the adventurers have done to a location, which will aid in determining other scene details and also when Rolling for Complications in the future. Additionally, Scene Details should almost always be accompanied by a tick on the Collateral Clock. This is discussed in detail later.
Adding Details to NPCs or creatures
If a character gets in a fight or similar situation where an NPC or creature is standing in their way, it will often only take one or two Details for the player to handle the situation. For example, if you’re trying to convince a person to let you through the door and into a more restricted area, you can add Bribed as a hard detail to them after rolling to see if they’ll accept your bribe. Maybe you’re in a fist fight with somebody after a conversation went the wrong way. You can add Knocked Out after winning a roll to punch them square in the jaw. However, the Arbiters can decide to declare that a stronger person or monster has a threshold before they are Overcome like the player characters. This would be some number of harm details that the NPC would need to take before they are completely taken out of the scene. This number should be between 2 and 4.
Action Rolls
When to call for an Action Roll
The Action Roll mechanic is in place to determine the results when an action taken by the player character has an uncertain outcome. When a player character tries to do something in one of the below categories, or another situation where the outcome being unclear is interesting, the Action Roll mechanics should be followed.
-
Doing that which a person doesn’t normally do, like climb a difficult surface, pick a lock, etc
-
Doing something dangerous, like attack a person/creature or jump across a chasm
-
Looking for a thing or some information that may be difficult to locate, like a secret entrance or the password to enter
-
Calling upon some memory or knowledge that the character might know, but hasn’t yet shown or used
-
Doing something that could cause harm to the world around them
-
Persuading or convincing another person in the world to do something that they don’t immediately want to do, especially if it’s against their perceived interest
-
Avoiding or reacting to some consequence or danger that is imminent
-
Observing or otherwise interacting with the world to glean information or notice something that’s happening that isn’t immediately obvious. This should only trigger an action roll if it will be interesting for the character to not catch on
When not to call for an action roll
Don’t call for an action roll for every little thing that the characters try to do. If the stakes are low or the character is known to be good at the action they are attempting, let them succeed. Action rolls should come into play when the outcome is not obvious, or when the potential for failure and consequence is more interesting than success. Don’t call for an action roll in order any time the characters try to get any information from the world. Most questions and requests to observe the world should be freely answered. Only use the roll when interesting consequences are a possibility.
“Passing and Failing”
Losing an Action roll doesn’t necessarily mean that your character failed in what they were trying to do. Often, the hard and scene details applied by the Arbiters will heavily complicate the action, but it should never lead you to a dead end. The question to answer after any Details are applied should always be, “What do you do?”
Action Roll Steps
The next page outlines the steps to follow when the Arbiters call for an action roll, with the following pages explaining each step in more detail.
It seems like there are a lot of steps to go through here, but that’s because it is broken down into as small of pieces as possible to make it easier to reference exactly what the rules have you do. I would recommend following along in the book the first couple of times you do this to get a feel for what each of the steps is designed to add to the story. It will slow things down at first, but it will be a breeze once your table is comfortable with the procedure.
Steps with an asterisk are optional.
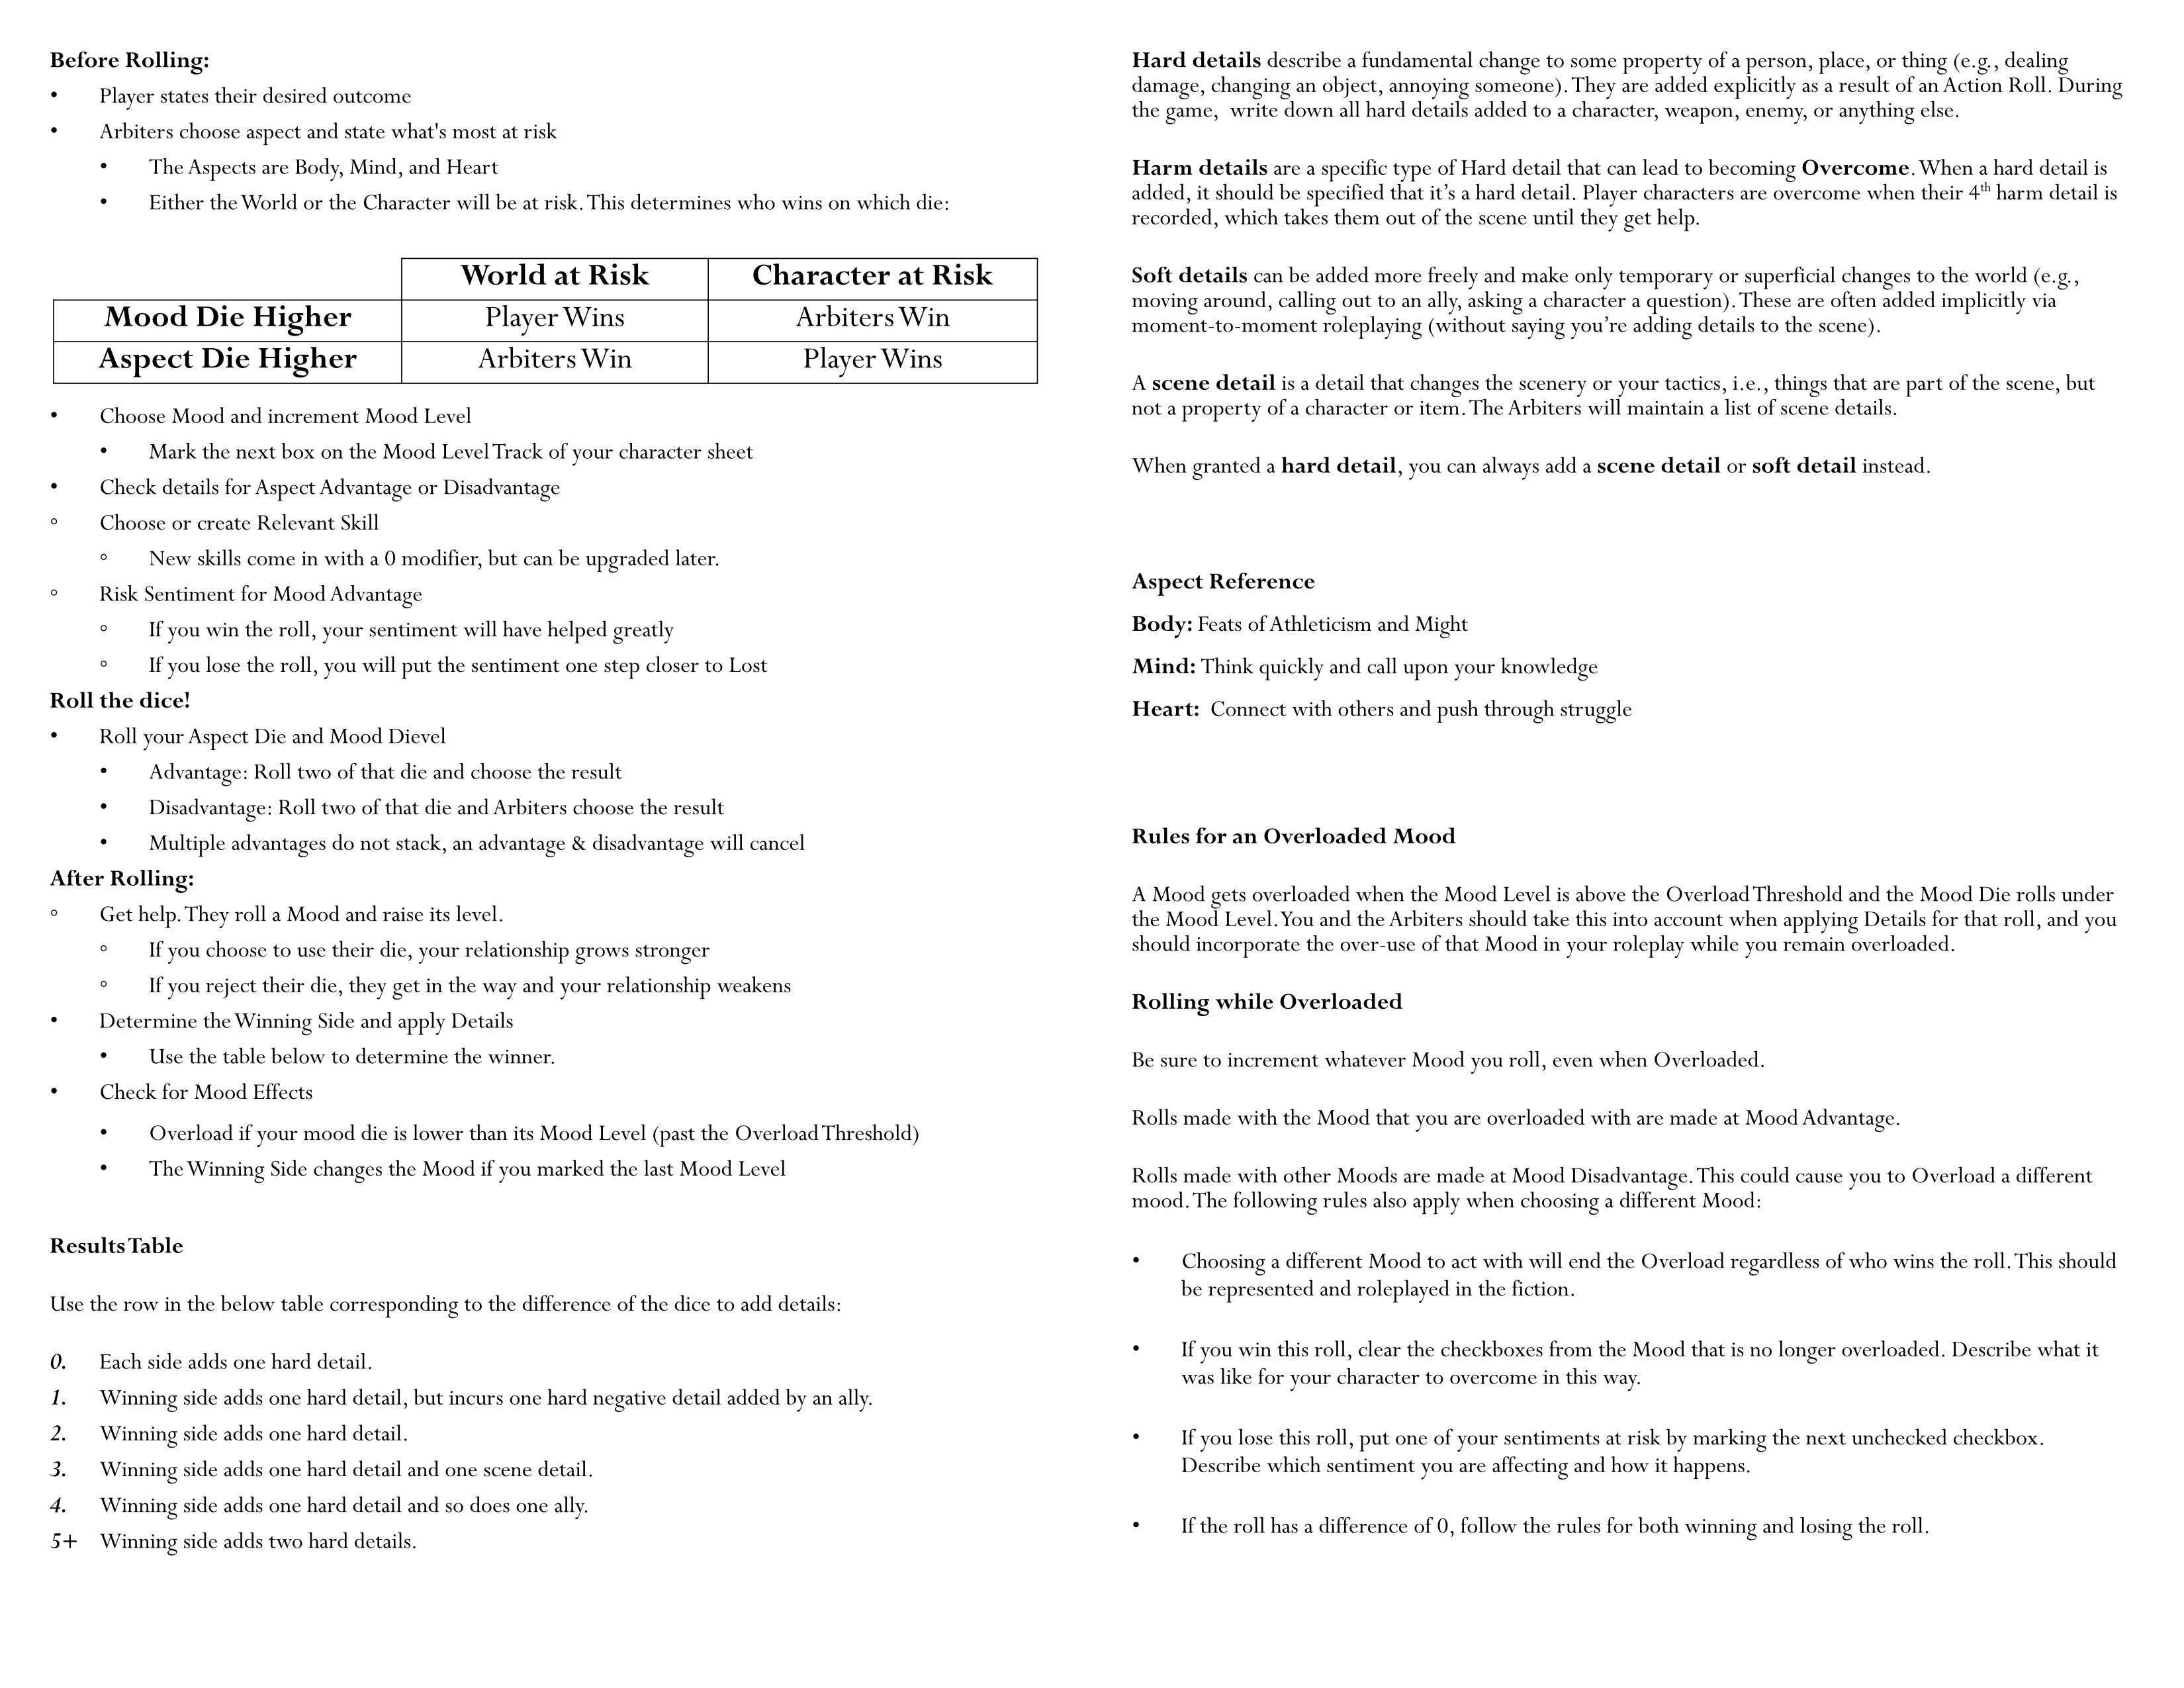
Before Rolling:
-
Player states their desired outcome
-
Arbiters choose aspect and state what’s most at risk
-
Choose Mood and increment Mood Level
-
Check details for Aspect Advantage or Disadvantage
-
Choose or create Relevant Skill*
-
Risk Sentiment for Mood Advantage*
Roll the dice!
- Roll your Aspect Die and Mood Die
After Rolling:
-
Get help. They roll a Mood and raise its level.*
-
Determine the Winning Side and apply Details
-
Check for Mood Effects
Player states their desired outcome
State what your character is attempting to accomplish. This should be the logical follow through of the action that you were roleplaying when the Arbiters called for an action roll. Now is the time to flesh out what you want to have happen with this course of action. This gets everyone at the table on the same page with what’s at stake and what success would look like.
Arbiters choose Aspect and state what’s most at risk
First, the Arbiters decide whether this action roll uses Body, Mind, or Heart. Body is used for feats of athleticism and might. Mind lends you the ability to think quickly and call on a breadth of knowledge. Heart represents your ability to connect with others and push through difficult situations. You will use the die associated with this Aspect when they roll.
The Arbiters then decide whether the consequences of this action are more likely to affect the Character or the World around them. The Arbiters should elaborate to the table why that is the case. Describe what the risk is and gesture at what failure might look like.
This decision will decide which die will count for which side when determining the result:
-
If the Character is at risk, the player playing that character will get the Aspect die and the Arbiters will get the Mood die.
-
If the World is at risk, the player will get the Mood die and the Arbiters get the Aspect die.
Player chooses Mood and increments Mood Level
The player rolling the action reflects on what mood their character is in at this time. If this is represented by one of the moods currently on your character sheet, choose that one. If not and there are still unfilled moods, add a new one to your sheet and choose that one. The die associated with this Mood is referred to as your Mood Die.
Next, mark one of the checkboxes next to the selected Mood on your sheet. These boxes represent your Mood Level for that given Mood. Always increment the Mood Level, even if one of your other moods is overloaded. If this is the final box to be checked, this action will endanger one of your sentiments and change the mood as discussed in the Check for Mood Effects step.
You should be honest about how your character is feeling here! It can be tempting to select a mood based on which die you want to roll, but only do that if you can justify that particular mood by roleplaying as though your character is feeling that way.
Check details for Aspect Advantage or Disadvantage
Check the details of your character and the scene. Anything that is working in your favor will provide Aspect Advantage, and anything that is working against you will provide Aspect Disadvantage. Instances of advantage and disadvantage will cancel each other out, but do not stack.
For both, you will roll your Aspect Die twice. With Advantage, you will choose the die. With disadvantage, the Arbiters choose.
Choose or create Relevant Skill (optional)
Choose one of the skills that you have listed on your character sheet that you can come up with a justification for why it applies here. Be creative! If you can convince the rest of the table that it makes sense to use a skill, you can use that skill. If there are still empty spaces on the sheet for skills, feel free to add a new one that would apply. New skills start with a modifier of 0, so it won’t benefit you yet.
Mark off the checkbox for Mind, Body, or Heart next to the chosen skill if it’s unchecked. Checking all three boxes will allow you to upgrade the modifier of your skills, so get creative and use them often.
Risk Sentiment for Mood Advantage (optional)
You can gain Mood Advantage by anteing one of your sentiments that are not yet lost. Mood advantage allows you to roll your Mood Die twice and choose which result to keep. Work with the Arbiters to factor in how your mood and sentiment led to the details that get added to the scene.
If the Arbiters or an ally get to add negative details to the scene, you will also mark the next checkbox of that sentiment. This moves it to At Risk if it wasn’t already, or Lost if it it was already At Risk.
Roll your Aspect and Mood dice
Roll the dice given by your Mood and your Aspect and find the difference between the results. Remember any Aspect or Mood Advantage or Disadvantage you received in the prior steps. If a mood is overloaded, you get advantage with that mood and disadvantage with all others.
If you have Advantage or Disadvantage for your Mood or Aspect, roll two of that die. Advantage allows the player to choose which die to keep, whereas disadvantage allows the Arbiters to choose.
Get help. They roll a Mood and raise its level (optional).
If another character is helping in the fiction, they can describe how they help and roll their Mood die. They raise their Mood level as well and you can use either die. This character checks for Mood Effects as described in the next step as well.
If you choose to take their die, describe how this moment strengthens your relationship. If you reject their die and use your own instead, describe how they got in the way and how it negatively affects the relationship.
Determine the Winning Side and apply Details
Once you and the Arbiters have resolved all advantages and disadvantages and chosen the final two dice that are involved, decide whether your chosen Skill Value is added or subtracted from the Aspect die.
Find the difference between the two dice rolled and determine the Winning Side:
If the World was determined to be more at risk, the player wins if the Mood Die is higher than the Aspect Die.
If the Character was determined to be more at risk, the player wins if the Aspect Die is higher than the Mood Die.
The intersection of this table gives you that information as well:
Results Table
Use the row in the below table corresponding to the difference of the dice to add details:
0: Each side adds one hard detail.
1: Winning side adds one hard detail, but incurs one hard negative detail added by an ally.
2: Winning side adds one hard detail.
3: Winning side adds one hard detail and one scene detail.
4: Winning side adds one hard detail and so does one ally.
5+ Winning side adds two hard details.
Check for Mood Effects
If the Mood Die’s result is less than your current Mood Level, and the Mood Level is past the Overload Threshold on the character sheet, you Overload that Mood. Describe what this looks like and follow the rules on the next page for an Overloaded Mood for future rolls. This also applies to a character that helped you.
If you marked the final box of this Mood Level, this mood will evolve somewhat to represent how often you find yourself acting this way. Reset the mood level to 0.
The Winning Side will change the name of the mood to something more specific and intense. Examples could include changing Angry to Enraged, Determined to Obsessed, Happy to Gleeful, Cautious to Cowardly, or Brave to Feckless. If you are an Arbiter making the change, ensure that the player whose character is changing is comfortable with and interested in the change you have proposed.
Rules for an Overloaded Mood
A Mood gets overloaded when the Mood Level is above the Overload Threshold and the Mood Die rolls under the Mood Level. You and the Arbiters should take this into account when applying Details for that roll, and you should incorporate the over-use of that Mood in your roleplay while you remain overloaded, as well as following these rules:
Be sure to increment whatever Mood you roll, even when Overloaded.
Rolls made with the Mood that you are overloaded with are made at Mood Advantage.
Rolls made with other Moods are made at Mood Disadvantage. This could cause you to Overload a different mood. The following rules also apply when choosing a different Mood:
-
Choosing a different Mood to act with will end the Overload regardless of who wins the roll. This should be represented and roleplayed in the fiction.
-
If you win this roll, clear the checkboxes from the Mood that is no longer overloaded. Describe what it was like for your character to overcome in this way.
-
If you lose this roll, put one of your sentiments at risk by marking the next unchecked checkbox. Describe which sentiment you are affecting and how it happens.
-
If the roll has a difference of 0, follow the rules for both winning and losing the roll.
Skills
Skills are anything that your character is good at. Each character starts with 3 skills that will immediately be helpful if they attempt to act in a way that uses those skills.These starting skills are also helpful for getting an idea of who this character is. Why are they good at origami, juggling, and flirting?
Using and creating skills
Each character starts with three skills that provide a + or - 1 to relevant rolls, and can add more through play.
To use a skill, you declare which one you are using before your roll. If you have no relevant skill, but do have some empty skill slots, you can create a new skill that you are trying to use which will start at +/- 0. Fill the name of that skill in on one of the empty lines and place a 0 in the modifier circle.
After rolling the dice, you decide whether to add or subtract the value of the skill from the Aspect Die.
Advancing skills
The 3 boxes to the right of each skill line allow you to keep track of which aspects have been used to make checks with that skill. Once you have completed an action roll with a skill, mark the box corresponding to the aspect used next to the skill on your sheet. When you’ve marked all 3 boxes, and thus completed a task with that skill using each of the three aspects, you are eligible to upgrade that skill as a free action during your next downtime as described in the Downtime Actions section.
Sentiments
During character creation, each player writes down 3 things that are important to their character. Each sentiment should evoke strong feelings when the character thinks about it, and it’s encouraged to show this through your roleplaying. A character’s sentiments are their prized possessions, relationships, ideals, beliefs, or anything else that your character holds dear. Seeing the three things that a character cares about is another lens into who they are and can help you jump right into roleplaying them.
Sentiment States
Sentiments can be in one of 3 states - connected, at risk, and lost. If neither checkbox on the character sheet is marked, the character is considered connected to that sentiment. The At Risk checkbox indicates if the sentiment is at risk, and the lost checkbox indicates that the sentiment is lost.A lost sentiment cannot be used mechanically at all.
Risking sentiments to gain Mood Advantage
Before rolling the dice, you can put your sentiment at risk to gain Mood Advantage on the roll. Mood advantage allows you to roll the dice given by your emotion twice and take either result. Depending on the effect level you achieve, the sentiment can be endangered. Before declaring this, you have to describe how the sentiment is coming into play for the roll. If the Arbiters or an ally get to add negative details to the scene, you will also mark the next checkbox of that sentiment.This moves it to At Risk if it wasn’t already, or Lost if it it was already At Risk.
How to use the Collateral Clock
When designing a location, the author makes note of what can be harmed by the explorers’ actions at that location. In general, when players stay at a location for too long, there will be more and more collateral damage. This is represented by an eight step “clock” at each location. Any player at any time can tick this clock if they feel that an action a character has taken leads the group closer to fully actualizing that harm.
Why have Collateral Clocks?
This game is partially about the adverse affects that are often left unspoken in stories about reclaiming a broken world. Often, to “reclaim” something you need to take it from someone or something else, displacing them in the process.When acting as Arbiter, it’s your job to consider the problems that are being caused as your story plays out. Fill out your descriptions and reactions of the world the characters live in with this in mind.
Collateral Clocks and Scene Details
Choosing whether the world or character is at risk on each action roll is done to help guide you to consider what kind of situations can arise when players act in dramatic ways. Factor in the listed danger and collateral from the location card and choose details that would drive home this conflict between the adventurer and the land they are interfering with.Tick the Collateral Clock when you are adding Details granted by action rolls in which the World was determined at risk.The Arbiters’ job is to introduce complications that lead to a more interesting story - make your Hard Details and Scene Details hit hard and show true consequences.