Introduction
After the world inevitably fell, people built a new one from its ashes. Time passed, and eventually this new world crumbled and was rebuilt once more. Some say this cycle is just the natural order of things. The people left after a collapse never agree on everything that went wrong. They lead their descendants to correct some of the errors that lead to collapse while repeating some of the others.
You are about to create a story that features characters living in a world unrecognizable to our own. Their society is starting to pick up the pieces after one of these cyclical crises. Natural catastrophes, manmade disasters, and maybe even external influences have caused collapse after collapse, but humanity has somehow hung on. Remainders of each of these civilizations and artifacts of their downfalls lurk hidden throughout the world.
Enough time has passed that many settlements have stabilized and are now looking to expand and explore what is around them. The characters that you will play live in one of these settlements and are tasked with exploring the world around the settlement and acquiring what resources and knowledge that can be found. While that may sound like a noble cause, the world around them is populated by other societies, recovering wildlife, unstable ecosystems, and volatile remnants from disasters past. If these adventurers aren’t careful, their actions will endanger their neighbors as well as their own homes…
No Stone Unturned is a tabletop roleplaying game for 2-5 people. Each of you will play a character who will be going on adventures in the world. You will also be taking turns acting as Arbiters, describing the world and how it reacts to the adventurer’s actions.
The game is best played as a short campaign, with several game sessions lasting 2-4 hours. In the first session, you will be guided through the world building and character creation steps outlined in the following pages. After that, you’ll set out on your first adventure.
In further sessions, you will continue to explore the world that you have built until it feels right to stop. Between adventures, you’ll see the characters during downtime as they rest and recuperate. You will also be seeing how your incursions change the world over time, and how those changes are often not for the better.
This game can also be played as a one-shot. If you plan to do this, I’d recommend moving through the world building and character creation steps as quickly as you can – it can be very easy to get so lost in building a world that you suddenly realize that you’re almost out of time. The steps provided on the following pages should guide you to building a cool world that you’re excited to play in, even if they are approached with a brisk pace.
Safety Tools
In this game, you will be collaborating on a story with improvisational, off-the-cuff roleplaying and creativity. The direction of the story is unpredictable, and so it’s important to make sure that everyone has the tools to redirect the conversation if they become uncomfortable in a way that they don’t wish to be. Whether the discomfort comes from venturing into a certain topic or the way other players are behaving, players should feel comfortable and safe. After all, this is a game and everyone should be having a good time.
Often when we find ourselves in a situation where we’re uncomfortable, it can be difficult to speak up for any number of reasons. There are several methods that are commonly used to make it easier to ensure a safer environment for play. Discuss with your group and decide what makes the most sense to put in place.
The X-Card: Originally designed by John Stavropolous, the X-Card is an index card with an X drawn on it that any player can at any time point to to walk back whatever is currently be discussed, no questions asked. A complete description can be found here.
Lines and Veils: Before the game starts, pull out two index cards and ask everyone to write down what their lines and veils are. Lines are topics that shouldn’t be brought up under any circumstance, whereas veils are topics that are fine to be in the story but should not be discussed in detail or zoomed in on.
Knocks: This is similar to the X-card, but without the card. Anybody can knock on the table, and everyone should either walk back what is being discussed or fast forward until it’s over.
Worldbuilding
Building a world collaboratively
Once you have discussed safety at the table, it’s time to start building the world that you will be playing in. The next couple of pages will walk you through several steps for this.
1. Discuss Broadly
Start with a brief discussion on what this post-post apocalypse setting should look like. You should try to agree on a tone for your game, as well as how you will be framing scenes. Should it be more serious and weird like the world of Numenera? Or should it be zany like what is seen in Adventure Time, with scenes and logic that you would only find in a cartoon? Is it ruinous and filled with living or robotic remnants of what came before, like Horizon: Zero Dawn? Don’t get too specific here, but try to think of some touch stones and get everybody on the same page.
2. Ban Story Elements
After a few minutes of discussion, you each get to ban something from the setting. Choose something you don’t think would be interesting in this story and write it on a notecard within view of everybody. This is the first opportunity to codify the results of the tonal discussion, as this ban list must be followed.
Do you want there to be no magic? No fantasy races? No dungeons or no dragons?
Note that this is not for banning things that make you uncomfortable in some way - this is meant to be a friendly game and you should tell your group to steer clear of topics that you’re not comfortable engaging in with them. See page 3 for more information about Safety Protocols.
This phase is more for restricting the lens of what the rest of the game can include from a storytelling perspective. It is perfectly valid to pass up this chance.
3. Drawing the Settlement
Next, you will collaboratively create the settlement that your characters live in and are adventuring into the world to find ways to improve.
Place a notecard in the center of the table. Choose a person to go first, and then take turns. On your turn, you will make a statement about the settlement, and draw something to represent that on the index card. Don’t worry if you can’t draw, neither can I. The player to your left will then make another statement, either introducing a new fact or further specifying a previous one. Also draw this on the index card. Continue around the table like this until either there is no more room on the index card, or two people have decided to pass on their turn. If you pass in one round you can always add a new idea the next round.
After a few turns of this, your group will start to get a better picture of how the world works. Keep building on each others’ ideas and a shared understanding of where your characters live will come from it.
Don’t put too much into just one statement. “The paved roads form a grid” works better than “The settlement is a city, with buildings on every block surrounded by paved roads in a grid shape”. Focus on only one aspect of life at a time and let the other players branch off from there.
4. Define adventure scope and conditions
Define the scope of the adventures and how far away the other locations in the world are from your settlement. Think about what the conditions of adventure are, and whether your characters are well equipped or struggling to get by. This will help color what the locations each player creates in the next step should look like as well as what your characters will have access to on their adventures.
Write down what you establish here so that everyone can access it later. The following questions help guide you in defining your scope, but are not a complete list.
-
How much time passes between adventures?
-
How long does it take to travel around the world?
-
Is the surrounding area dangerous or easy to traverse?
-
Do people generally need to eat and sleep? If so, how often? What do they eat?
-
What can you assume that your characters will be carrying? Swords? Guns? Nothing?
-
What’s the general level of technology available to the settlement?
-
How do people get around in this world? Can they fly? Use phones? Teleport?
-
What’s the day/night schedule like? How often do the seasons change?
-
Can you maintain contact with your home settlement while adventuring?
5. Create scarcities and abundances
Each player then names a resource that is important to your community. If you’re playing with less than 5 people, collectively establish a couple more resources until you have 5 total. Then, decide together which one of these resources is in abundance and mark the rest as scarcities. One of the players’ main tasks will be to secure these resources from locations around them. Note these down on a notecard within view of everybody.
Understand resources broadly here. At its simplest, this can mean food or water, but anything that a society needs and uses can be put forth here. Entertainment, camraderie, sunlight, agricultural variety, you name it. The point of this exercise is to define what’s important as well as what’s lacking, so if you say something like “competitive spirit” or “comfortable beds and couches” then those become a focus of the daily lives of your characters.
6. Author locations
Now that you have an idea of the settlement, it’s time to build out the surrounding area that your characters will be adventuring in. This is done by creating a map on the table using index cards. You will each privately be authoring two locations that will be out in the world somewhere.
Each player takes two index cards and creates two locations. These can be anything - a cave system with mysterious artifacts inside, a populated city, a haunted mansion, whatever you might want to see in play. The only rule here is that you can’t contradict facts that were established in the settlement building phase or use story elements that were banned. While doing this, you can chat and futher clarify the world, but don’t show anyone your card.
Draw what is here and write a short description of the place.
Draw an 8-piece pie chart in the corner. This will be the Collateral Clock at this location. Write a few words underneath it describing what at this location can be harmed if the characters interfere here. Examples could include animals or people that live here, the social structures of the population that are here already, a food or water source for local or regional inhabitants, etc.
Write, briefly, what type of danger might lurk there - monsters, nature, people who are resistant to your goals, etc.
Write what type of treasure or knowledge might be found there. Examples could be ancient troves of knowledge, artifacts from a civilization past, a population to be your allies, something to address one of the shortages at home, or something that helps solve a mystery that came up at the settlement. Anything that the characters may want to collect or absorb works here.
7. Arrange locations in a map
Mix up the created locations and place them face down in some arrangement on the table. This will be your map and represent where places are with respect to each other. If you want to have to pass through locations to get to others often, create a pattern to represent that and define the paths that you will need to take to get from card to card. You can also create a tightly packed grid so that it’s easy to get to any location card. Feel free to leave blank spots as well.
Depending on the scope that your group defined the pattern you choose may make a big difference. If each card is defined to be a one day journey away from the next, then it’s less important because the adventurers can go back and forth from the locations to home. However, if it takes weeks to travel from place to place, adventuring far from home will be more stressful and taxing, as you will return home to allow your characters to relax and recover much less often.
8. Assign Danger and Reward Levels
Now that you have a map of the surrounding area, you will roll dice for each card to see how dangerous and how rewarding the locations will be for adventurers.
Roll 2 4-sided dice for each notecard. The first d4 will dictate how potent the listed danger is to the adventurers, and the second d4 will dictate how useful the listed reward will be to the party if it is found. Write these values on the back blank side of each card (e.g. D2 R4). See the “Danger and Reward Levels” section for a detailed explanation of what these values mean.
9. Character Creation
Your world is now built. You should now have a good idea of where your characters live and what their lives are like. You also now have a map of locations that they will explore and investigate. The next pages walk you through creating the characters that you will play for the rest of the game.
Creating your characters
Your characters are made up of several different elements. Some of these elements will be decided now, and others will be discovered through play. Take a character sheet and fill out the fields as described below.
1. Choose a name
Come up with a name for your character. You can either do this now, or wait until the end.
2. Define your pronouns and look
Note your characters pronouns and describe what they look like. Are they human? What kind of clothes do they wear?
3. Pick three moods
Choose 3 moods your character is most often experiencing while they adventure. Examples can include Feckless, Angry, Joyous, Jealous, Ambivalent, or Curious, but really any moods that you’re interested in roleplaying will do.
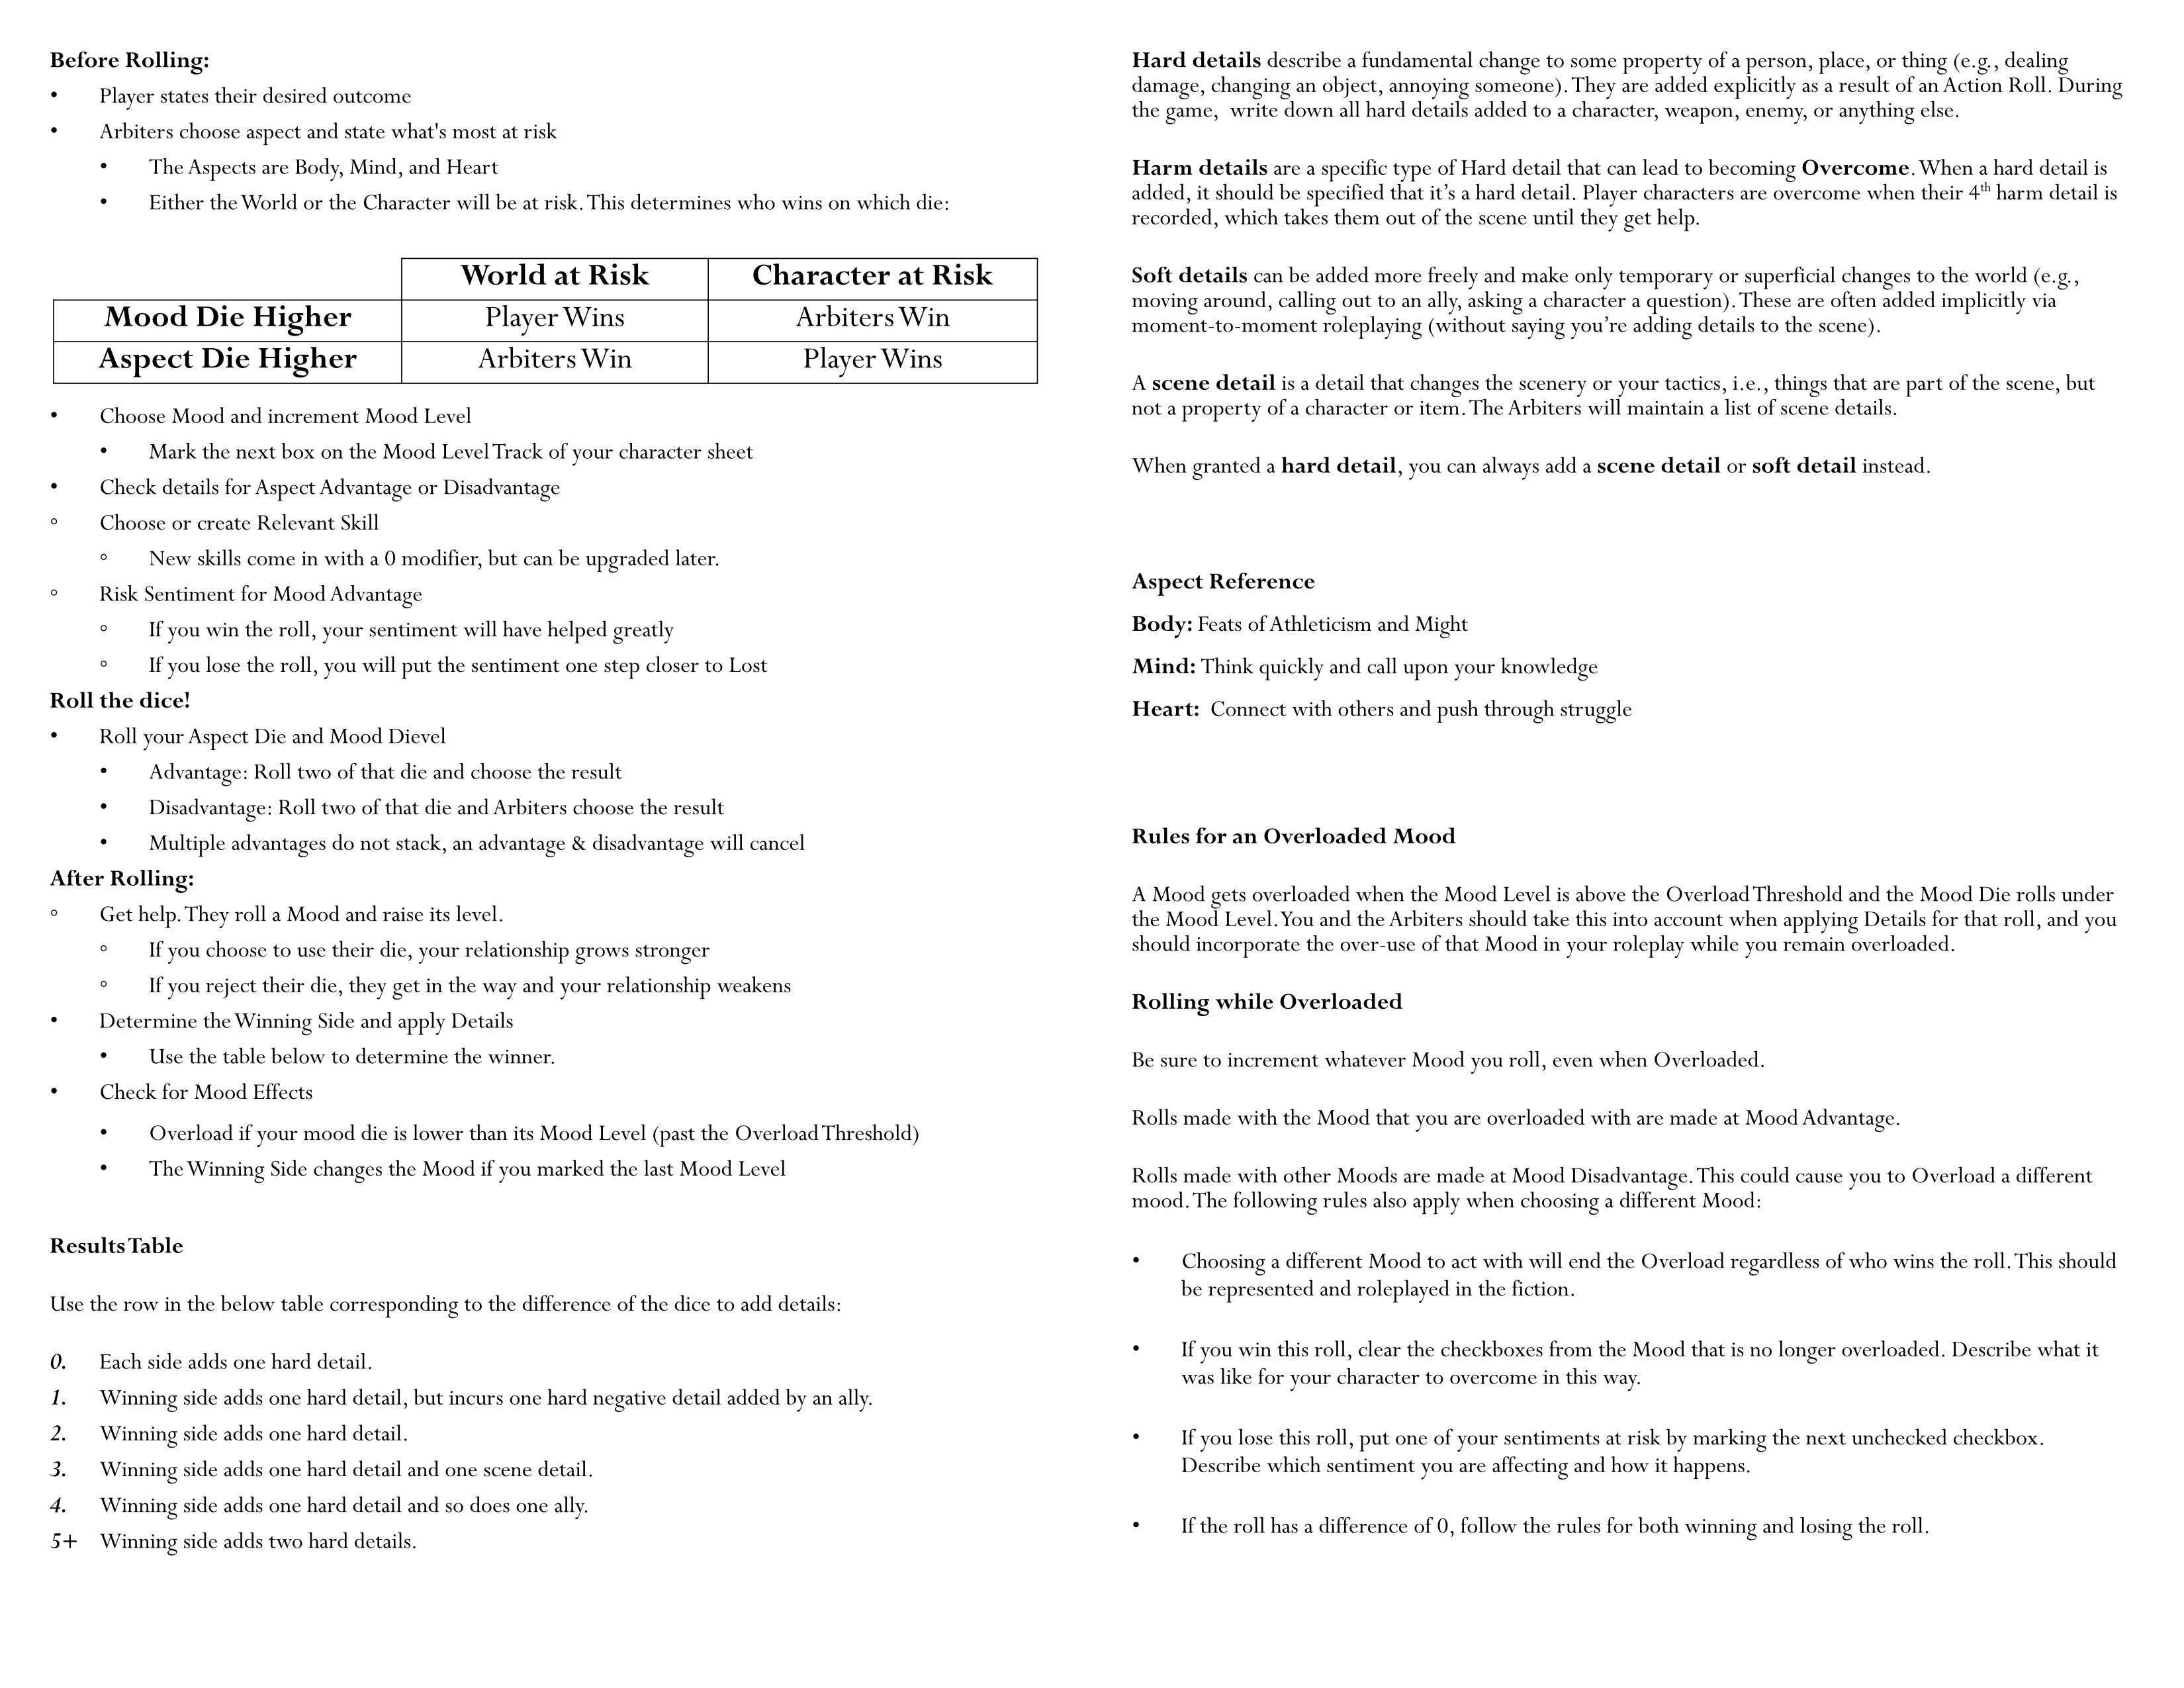
Assign one mood to a d8, one to a d6, and one to a d4 line on your character sheet. When you make an Action Roll while playing the game, you will be using the die granted to you by the mood your character is acting from.
A bigger die roll doesn’t always mean better. If your actions have a chance to harm you, rolling a bigger Mood die will mean you are more likely to get hurt. However, if your action is more likely to damage the environment, a bigger Mood die means you are more likely to succeed and avoid those complications.
Thus, choose your d8 Mood as the one your character acts from when they’re taking care not to damage the world around them, and the d4 when they’re protecting themselves. The d6 will be somewhere in between. The specific dice mechanics are explained in a later section.
These three moods are not every possible mood that your character can experience. There are three slots left open at character creation. During play, you can assign a new mood if the currently listed ones with don’t fit how your character is feeling.
4. Assign your aspects
Assign Body, Mind, and Heart to the d4, d6, and d8 based on how your character performs certain tasks. Body is used for feats of athleticism and might. Mind lends you the ability to think quickly and call on a breadth of knowledge. Heart represents your ability to connect with others and push through difficult situations.
As mentioned in the Moods section, bigger doesn’t always mean better. The aspect dice are the opposite: a bigger die typically means you’re better at protecting yourself using that aspect, but potentially at the expense of your surroundings.
5. Invent three sentiments
Next is to choose three things that are important to your character. These could be prized possessions, relationships, ideals, beliefs, or anything else that your character holds dear. Try not to have more than one of each of these sentimental categories, e.g. one possession, one belief, and one relationship. If you want to forge a relationship with another character as one of your sentiments, it’s okay to leave a line here blank until everyone has introduced themselves.
Mechanically, these sentiments will provide the ability to modify your dice rolls and results at the risk of them being lost to you or corrupted in some way by the world.
6. Write three skills
Describe broadly 3 actions that your character is good at doing. Conversation, swordplay, climbing, parkour. Mark them down in the skills section as +/-1 skills. These can be leveled up later and new skills can be added, as described in the skills section.
7. Consider the rumors
As a player, you authored 2 locations that now exist in the world. Your character has heard something about each of them. Consider how they have come across these rumors and what they’ve heard. They don’t know where exactly these locations are, but they would certainly recognize them upon arrival.
8. Introduce yourself
Once everyone has finished making a character, go around the table and introduce yourselves. Describe how your character looks, what they’re good at, and what they care about.
Danger Levels
The Danger Level gives a guideline for how perilous it should feel to be in an area. Typically, in an area with a higher danger level, you should be assigning Harm Details when players lose rolls more often. Below is a detailed description of how the different danger levels change the tone of a location.
D1. You can avoid the worst of the danger by being careful. Wildlife is reserved and defensive, and people who live here tend to give you the benefit of the doubt.
D2. There are dangerous things here, but you’ll know about it before it happens. Most wildlife only attack when provoked, and the people who live here are generally welcoming, if cautious.
D3. The danger here is meaningful. Wildlife is wary and has the means to hurt you if they choose to strike. People aren’t the most welcoming, and if you manage to make peaceful contact, you should not cross them.
D4. Most things in the area are hostile to you. The consequences for improperly engaging are great. Wildlife won’t wait for a reason to strike, and you must work hard to prove that you are trustworthy to any people.
Reward Levels
The Reward Level of an area indicates how useful treasures and knowledge gained in an area will be. The below descriptions indicate how easy and useful a location’s reward will be if it’s fully acquired.
R1. The reward here is scattered, encoded, broken, or otherwise difficult to access. Mechanically, it will take a long term project to utilize the reward properly. At best, this reward combined with completing a long term project to unlock it will move a scarcity to neutral (not abundance).
R2. A long-term project during downtime can move a resource from a scarcity to neutral. A second project would be required to then move it to abundance. For example, if the reward is an electric generator, you might need to first complete a project to see how the generator works before you can start a project to fuel it and turn it on.
R3. This can completely move a scarcity to neutral. A long term project can yield more of its potential and lead it to abundance. If the reward doesn’t address a scarcity, this can create a new abundance.
R4. This can move a scarcity to abundance if fully recovered and taken back to the settlement. The thing that can be found here is very useful and useable.